Screw-Retained versus Cemented Implant Crowns

In our office, we restore tons of dental implants. So naturally, we keep abreast of the latest techniques in creating teeth that look, feel, and function like real ones.

And because we like to post so much implant information and photos on this site, we get lots of patients who ask us great questions. Recently, we’ve had a lot of inquiries on cemented versus screw-retained crowns. So we decided to do a post on it!

Screw Retained Implant Crown Photos

Below is a photo of one of many cases we’ve completed recently:

High quality photos of screw retained implant crowns

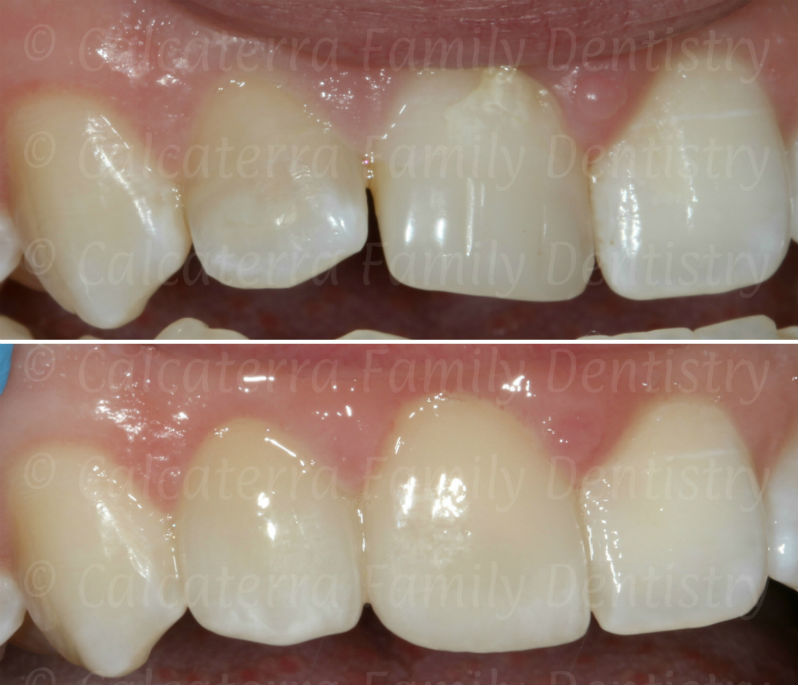
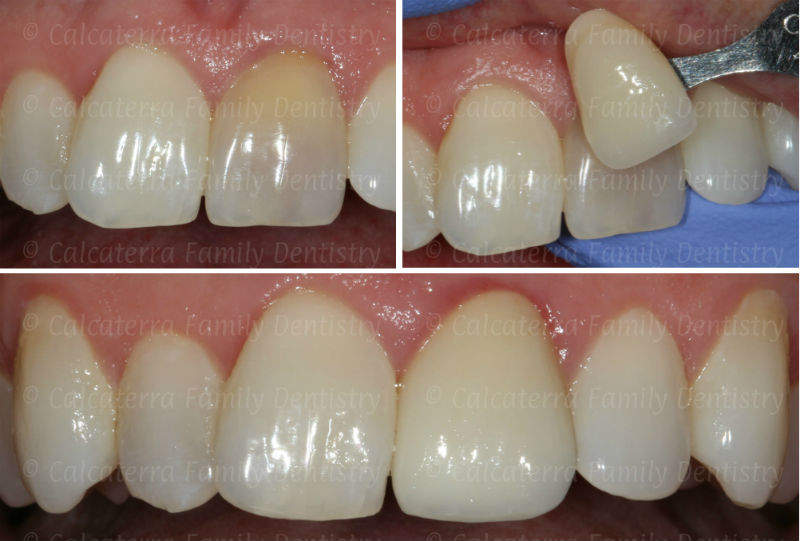
Photos of screw retained implant crowns. She went from bare implants to two new teeth in 45 minutes. Dentistry and photos Dr. Nicholas Calcaterra.

In the above case, you can see the screw heads peeking through the crowns in the second photo. We then placed a small filling over each screw head. She received two teeth in less than hour. By using this design, we did not need to use cement. But why did we choose screw-retained crowns?

Reasons for Screw-Retained Implant Crowns

dental implant no cement next to it

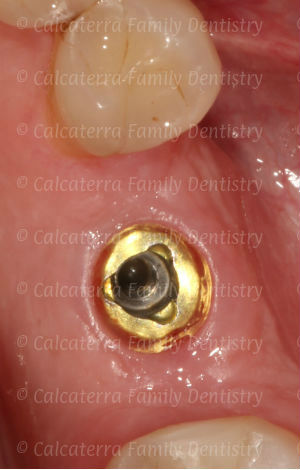
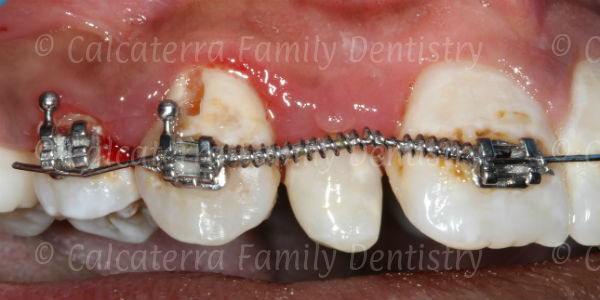
Excess cement around this implant can lead to failure.

In the past, many dental implant crowns were cemented on. This can lead to two potential issues:

  1. Retrievability: when a crown is cemented on, it cannot be removed without destroying it. So if there is ever an issue down the road, there is no easy way to address it without cutting off the crown.
  2. Implant Failures: research is showing that excess cement remaining on an implant after cementation can lead to implant failure. It can be difficult to find and locate all the excess cement that might remain.

When a crown is held on by a screw, it can be removed within 5 minutes if there is ever a problem. And since there is no cement used, there is no potential for failure due to excess cement.

So why not Use Screw-Retained Crowns all the Time?

That’s a great question! In many cases, the screw hole can affect the esthetics. This usually is not an issue for back teeth like molars. But when it comes to a front tooth crown, we have to take every single detail into account.

front tooth dental implant has to be cemented

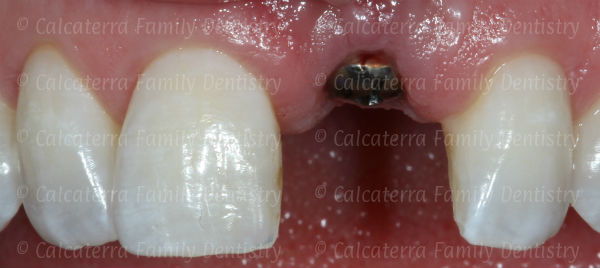
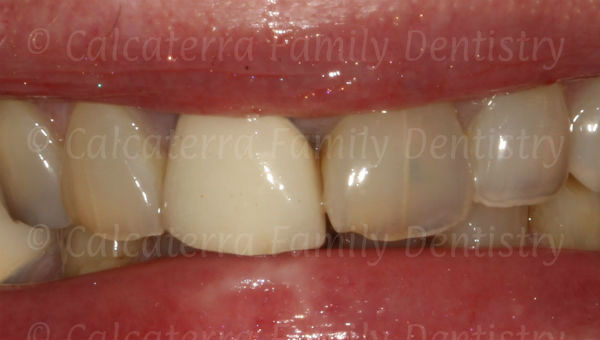
In restoring this front tooth dental implant, we had to use cement. Photo and dentistry Dr. Nicholas Calcaterra.

In the above case, the screw hole would have affected the esthetics. And given that it is a front tooth – we want and need perfection. So in these types of cases we typically use cemented-on crowns.

Are you interested in implants? Do you have an implant but not a crown yet? Call us at (203) 799 – 2929 if you would like to know your options.

Reference on the the dangers of excess cement: The positive relationship between excess cement and perio-implant disease: A prospective clinical endoscopic study. Wilson TG Jr., Journal of Periodontology, 2009  80(9) : 1388 – 92).

Fixing White Spots after Braces with Bonding

We see many patients in our office who did not take care of their teeth when braces were on. Before the braces went on, their teeth were fine. Two years later, the braces come off, and everyone collectively winces and says “Oh my!”

White spots, brown spots, and decay can all result from a lack of proper hygiene during orthodontic treatment. Many cases need to be fixed with dental bonding.

Before and After Photos of White Spot Correction

Below are photos showing how we fixed a rather severe case:

Before and After photos showing fixing white spots with bonding

This young woman from Orange did not take care of her teeth when her braces were on.  We fixed it with bonding. Note the orange tongue ring – which we told her not to wear. Photos and dentistry Dr. Nicholas Calcaterra.

In the above photo, you can see both banded white spots as well as brown spots. All are characteristic of poor hygiene during orthodontic treatment. Her case was so severe that correction with MI Paste was not an option. This was completed over two visits with dental bonding and she was ecstatic!

Note the orange tongue ring… which we told her not to wear. Oh well… we can’t win every battle!

White Spots and Decay Already Forming

We thought we would post this photo to show what poor hygiene can look like:

Not brushing with braces on leads to white spots

His teeth were perfectly white before the braces went on. We counseled him and his parents immediately. His orthodontist was aware of this.

Notice the white spots, the brown areas, the inflamed gums, and the actual cavity forming? With a lot of hard work, we were able to turn the ship around. But his teeth were perfect before the braces went on.

We’d Love to do Bonding… Not!

We are always up for the challenge of fixing a patient’s smile after braces. We have dozens of before and after photos we could post. But what we love even more is watching the braces come off and not having to do a darn thing!

So, let’s avoid the need for bonding, correction with MI Paste, and veneers… just take care of your teeth when the braces are on and you’ll be all set!

Fifty Shades of Teeth

Have you ever looked at someone’s smile and immediately thought to yourself “Ouch, that tooth sticks out like a sore thumb!”

Front tooth crown with a bad color and shade match

This tooth was very noticeable. Photo by Dr. Nicholas Calcaterra – dentistry by someone else!

This patient was very uncomfortable with her smile. And she had every right to be uncomfortable (if you want to see how we fixed her smile you can go here).

When we analyze the shades of front teeth, we use what is called the 3-D shade guide. The guide is used by cosmetic dentists and has close to 30 shades. Then, when you factor in other variables such as translucency and light reflection, you get close to fifty shades of teeth!

So how do we achieve dramatic results?

A Match Made in Heaven

Let’s answer the question by looking at some dramatic results with before and after photos:

high quality before and after front teeth photo showing shade matching

We bent over backwards to match the shade. Without the pre-op photo, you would not be able to tell which teeth have crowns! Photo and dentistry Dr. Nicholas Calcaterra.

The above patient lives in Orange and is a student at Amity Regional High School. He suffered trauma to his two front teeth with both requiring root canals. One of his teeth was repaired by another office using bonding. The repair – somewhat sloppy – is very noticeable because the shade and contour do not match.

Because of the history of trauma, we did cosmetic all ceramic crowns on both teeth. We worked extremely hard, going through multiple steps (as outlined below), and were able to achieve a remarkable success. We believe the photos speak for themselves.

Shade Matching – A Team Approach

Many of you are probably asking – how do you achieve this?

Process to match a front tooth crown by color and best dental shade.

He began with a very dark crown due to trauma, as seen in the upper left. In the upper right, we hold one of many different shade tabs as part of our analysis. Note that he did NOT want the “tilt” or “midline slant” corrected – only the shade – because he felt that was his signature look! Dentistry and photos Dr. Nicholas Calcaterra.

We take a very rigorous and systematic approach. Some of the steps include:

  • We analyze your smile and the teeth/tooth bothering you. We first understand what your concerns are. We then recommend the most appropriate solution.
  • Based on your specific needs, we then select one of many Connecticut based labs that we use. We don’t ship our labwork overseas.
  • We take multiple photos and sometimes have you meet with a lab technician for a custom shade match.
  • We then let you try it in for a test drive – if you don’t like it – we tweak the shade until you are 100% satisfied.

Throughout the process, it is a team approach: our team, the lab, and you.

If you are unhappy with the shade of your crowns and would like to meet with us, call us at (203) 799 – 2929 or visit this page. We’d love to have you experience fifty shades of teeth.

Bye Bye Peg Lateral!

Every so often, we see peg laterals in our office in Orange. A peg lateral is an upper lateral incisor (the teeth directly next to your two front teeth) that has a peg shape. Since these teeth are very visible when you smile, our patients frequently want us to fix the appearance. Let’s look at a recent case we did using bonding:

Before and after photo fixing peg laterail incisor with bonding

Before and after photo showing how we fixed a right peg lateral incisor with bonding. Dentistry and photos by Dr. Nicholas Calcaterra

The above patient is a 17 year old Amity High School junior who just completed orthodontics. We coordinated the efforts with his orthodontist (Dr. Phil Caporusso) so that when the braces came off, we got to work. We used bonding and gave him a new look in a little less than an hour!

How Peg Laterals can be Fixed

The appearance of a peg lateral can be addressed in two basic ways.

  1. Porcelain Veneers – with veneers, a thin piece of cosmetic porcelain is placed over the front surface of the tooth. Veneers last longer than bonding and will always look better. The downside is that they are much more expensive and require 2 visits to complete.
  2. Bonding – in bonding, white filling material is placed over the tooth and then polished. Bonding is done in one visit and is less expensive than veeners. The downside is that bonding will not last as long and typically does not look quite as good (although with expertise you can get a very natural result as seen above).

We always discuss your particular case with you prior to making a recommendation for which option (veneers vs. bonding).

Peg Lateral Trivia

Some interesting tidbits we’ve learned from fixing dozens of these teeth over the years:

  • The overall prevalence in the general population is 1.8%. That may seem high. But then again, most patients have these repaired so you can’t tell. If the above patient smiled at you do you think you could tell? We didn’t think so.
  • In cases of single peg laterals, the left side is twice as common as the right. So our patient was a unique one!
  • Women are 1.35 times more likely than men to have one or both teeth affected.

The above data were compiled from this research study.

Do you have a peg lateral that you would like us to evaluate? If so call us at (203) 799 – 2929 or visit this page. And remember, don’t try fit these pegs into a round hole!